> ## Documentation Index
> Fetch the complete documentation index at: https://openops-ecb4f397-mintlify-external-database-workflow-output.mintlify.site/llms.txt
> Use this file to discover all available pages before exploring further.
# LLM Connections
> How to integrate OpenOps with an LLM provider of your choice
export const NarrowImage = ({src, alt, widthPercent}) => {
const className = `narrow-image-${useId().replace(/:/g, '-')}`;
const widthRule = widthPercent ? `width: ${widthPercent}%;` : '';
return <>
 ;
};
Using [AI assistance](/ai-assistance/overview) in OpenOps requires enabling AI in OpenOps settings and configuring at least one connection to a large language model (LLM) provider.
## Configuring an LLM connection
To enable AI and configure an LLM connection:
1. In the OpenOps left sidebar, click the **Settings** icon at the bottom:
2. In the **Settings** view, click **OpenOps AI**:
;
};
Using [AI assistance](/ai-assistance/overview) in OpenOps requires enabling AI in OpenOps settings and configuring at least one connection to a large language model (LLM) provider.
## Configuring an LLM connection
To enable AI and configure an LLM connection:
1. In the OpenOps left sidebar, click the **Settings** icon at the bottom:
2. In the **Settings** view, click **OpenOps AI**:
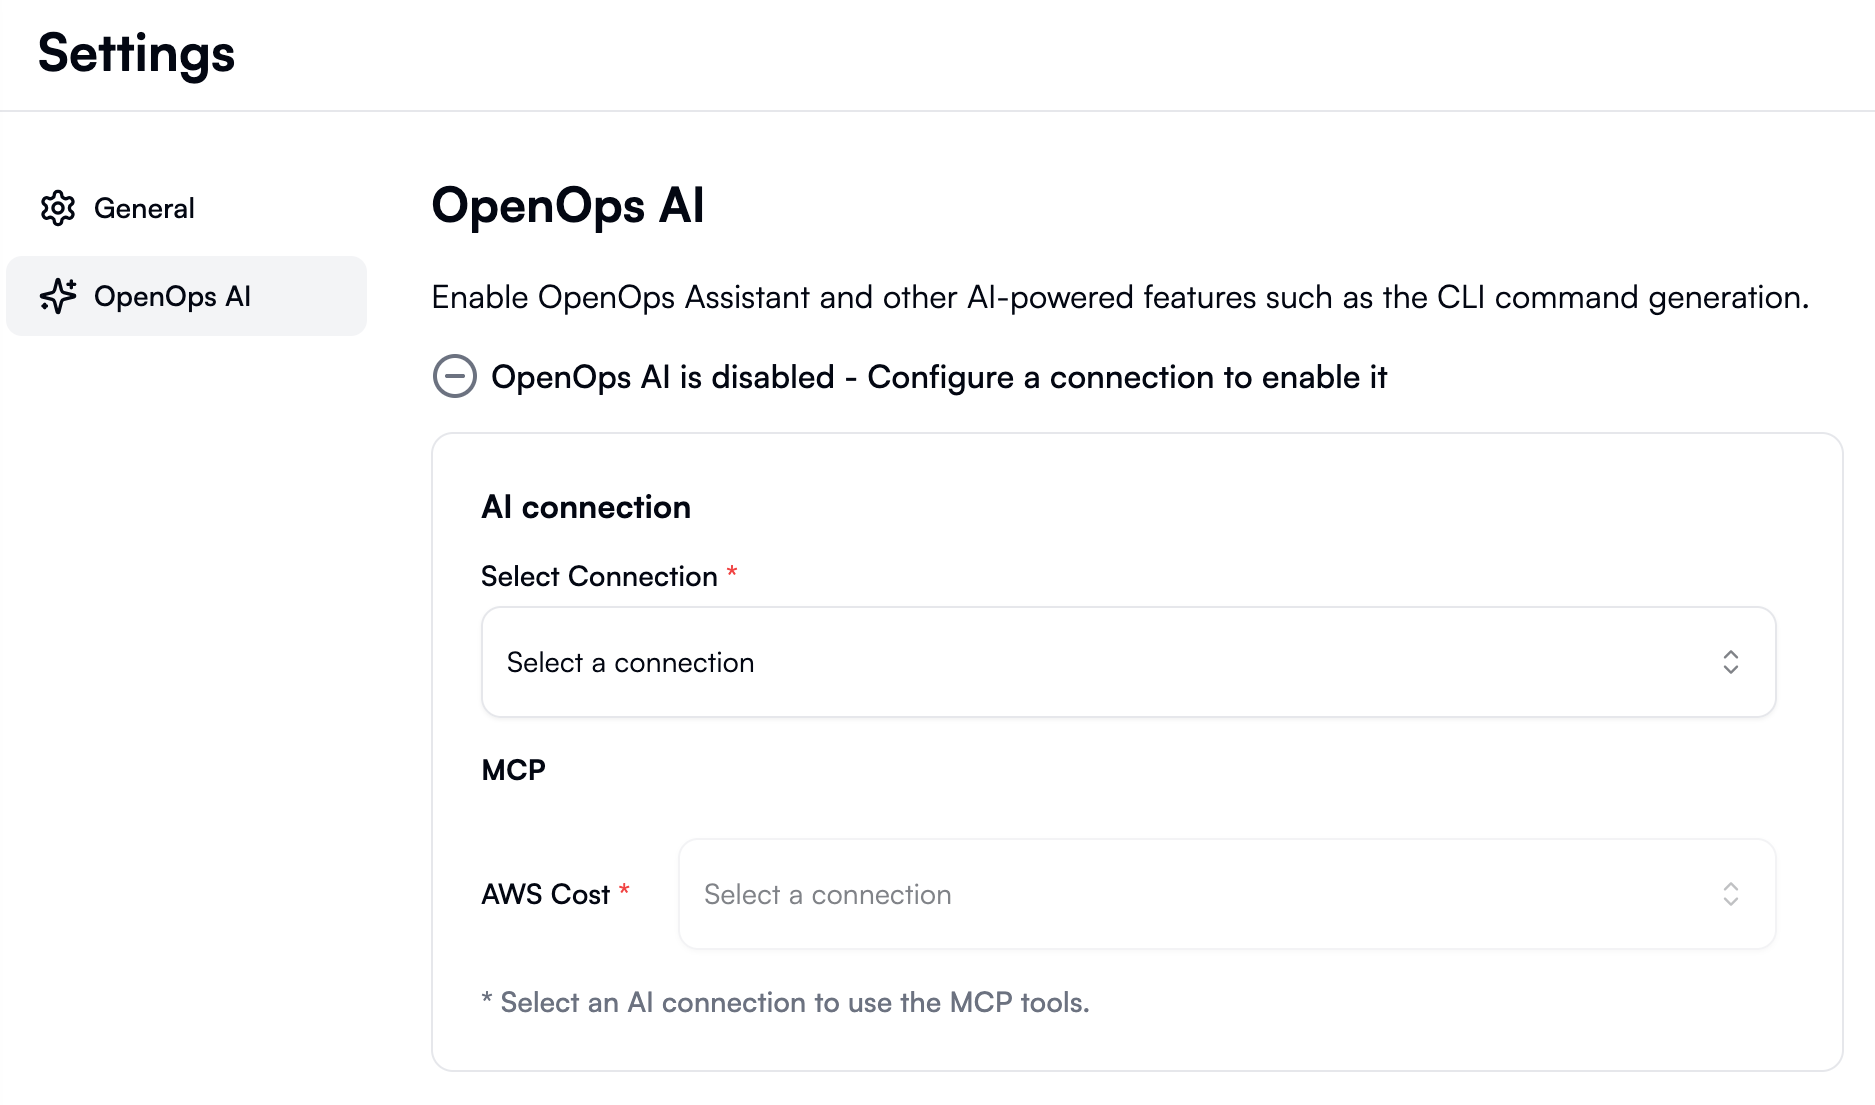 3. Under **AI Connection**, click the dropdown and select **Create new connection**. The **Create AI Connection** view opens:
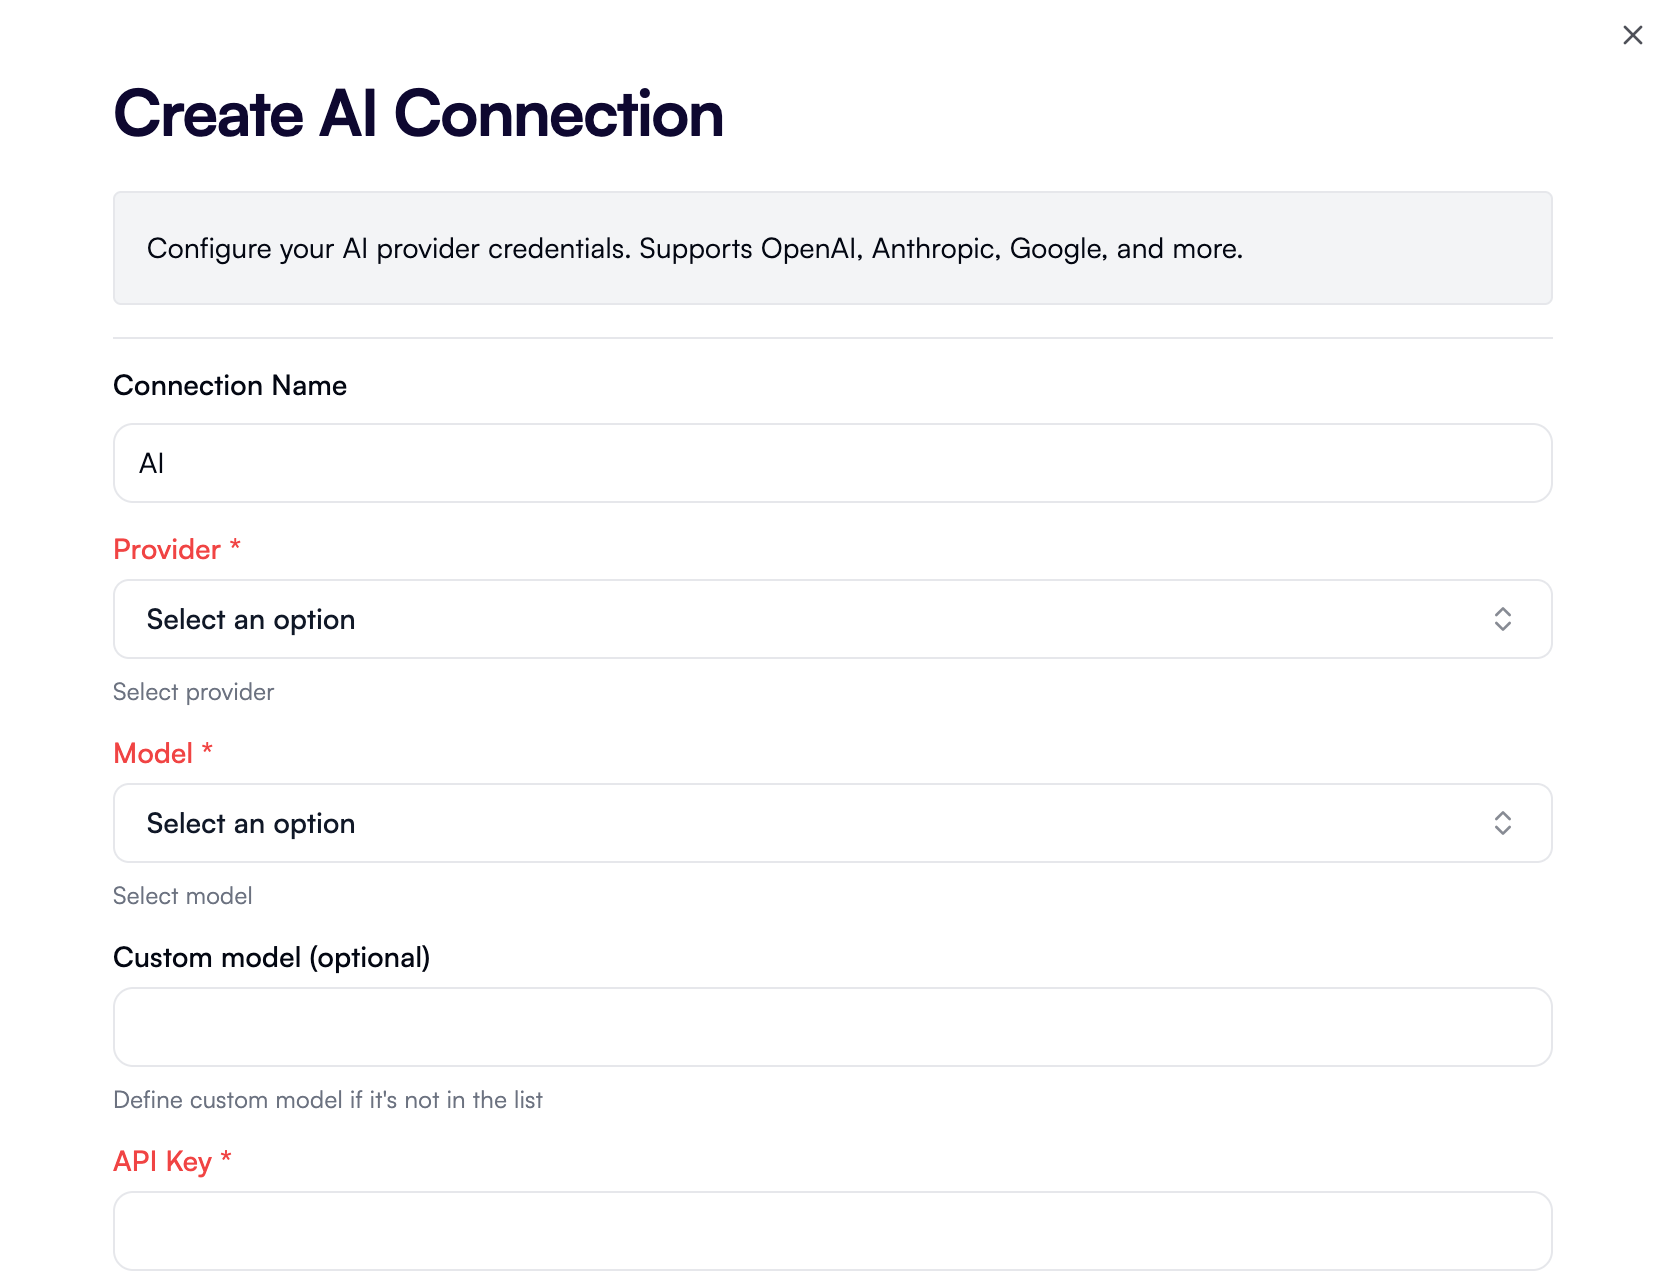 4. In the **Provider** dropdown, select one of the supported LLM providers. Anthropic, Azure OpenAI, Cerebras, Cohere, Deep Infra, DeepSeek, Google Generative AI, Google Vertex AI, Groq, Mistral, OpenAI, OpenAI-compatible providers, Perplexity, Together.ai, and xAI Grok are currently supported.
5. In the **Model** dropdown, select one of the models your LLM provider supports. (If you're configuring Azure OpenAI, select **Custom** instead of a model and complete the other [Azure OpenAI-specific steps](#azure-openai).)
6. (Optional) If the model you're looking for is not listed, specify a custom model in the **Custom model** field. This overrides whatever you've selected under **Model**.
7. Enter your API key for the selected LLM provider in the **API Key** field.
8. (Optional) Enter a **Base URL** for the selected model. This is useful if you want to use a proxy or if your LLM provider does not use the default base URL. If you selected *OpenAI Compatible* as the provider, then you are required to enter the base URL.
9. (Optional) Use the **Provider settings** and **Model settings** fields to specify custom parameters as JSON. The JSON schema varies depending on the chosen provider and model:
* See the [Azure OpenAI](#azure-openai) and [Google Vertex AI](#google-vertex-ai) instructions for custom provider settings required by these providers.
* If you've selected OpenAI, use **Provider settings** for JSON you'd normally pass to the `createOpenAI` function, and **Model settings** for JSON you'd normally pass to the `streamText` function. For more details, see the [OpenAI documentation](https://platform.openai.com/docs/api-reference).
10. Click **Save** to apply your changes in the **Create AI Connection** view.
11. (Optional) Back in the **OpenOps AI** section, if you're working with AWS and you want your AI connection to have access to AWS MCP servers, go to the **MCP** section and select an [AWS connection](/cloud-access/access-levels-permissions/#aws-connections) in the **AWS Cost** dropdown:
4. In the **Provider** dropdown, select one of the supported LLM providers. Anthropic, Azure OpenAI, Cerebras, Cohere, Deep Infra, DeepSeek, Google Generative AI, Google Vertex AI, Groq, Mistral, OpenAI, OpenAI-compatible providers, Perplexity, Together.ai, and xAI Grok are currently supported.
5. In the **Model** dropdown, select one of the models your LLM provider supports. (If you're configuring Azure OpenAI, select **Custom** instead of a model and complete the other [Azure OpenAI-specific steps](#azure-openai).)
6. (Optional) If the model you're looking for is not listed, specify a custom model in the **Custom model** field. This overrides whatever you've selected under **Model**.
7. Enter your API key for the selected LLM provider in the **API Key** field.
8. (Optional) Enter a **Base URL** for the selected model. This is useful if you want to use a proxy or if your LLM provider does not use the default base URL. If you selected *OpenAI Compatible* as the provider, then you are required to enter the base URL.
9. (Optional) Use the **Provider settings** and **Model settings** fields to specify custom parameters as JSON. The JSON schema varies depending on the chosen provider and model:
* See the [Azure OpenAI](#azure-openai) and [Google Vertex AI](#google-vertex-ai) instructions for custom provider settings required by these providers.
* If you've selected OpenAI, use **Provider settings** for JSON you'd normally pass to the `createOpenAI` function, and **Model settings** for JSON you'd normally pass to the `streamText` function. For more details, see the [OpenAI documentation](https://platform.openai.com/docs/api-reference).
10. Click **Save** to apply your changes in the **Create AI Connection** view.
11. (Optional) Back in the **OpenOps AI** section, if you're working with AWS and you want your AI connection to have access to AWS MCP servers, go to the **MCP** section and select an [AWS connection](/cloud-access/access-levels-permissions/#aws-connections) in the **AWS Cost** dropdown:
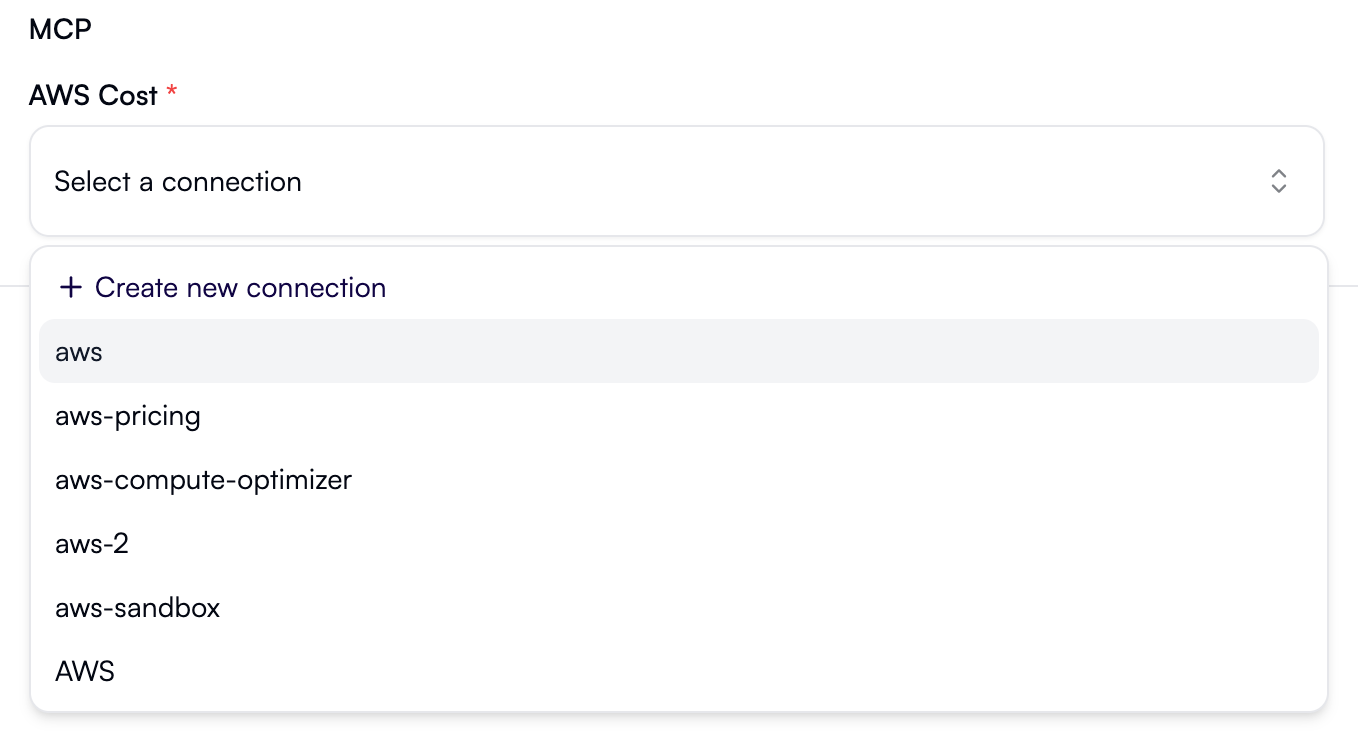 This enables access to AWS Cost Explorer MCP Server, AWS Pricing MCP Server, and AWS Billing and Cost Management MCP Server.
Configuring an LLM connection enables all [AI assistance features](/ai-assistance/overview) in OpenOps.
## Provider-specific settings
Some LLM providers require additional configuration beyond the API key or may require non-standard settings. This section offers guidance for some of the most common providers in this category.
### Azure OpenAI
When configuring an AI connection where Azure OpenAI serves as the provider:
1. In the **Model** dropdown, select **Custom**.
2. In the **Custom model** field, enter the name of a model deployment in your Azure OpenAI resource (for example, `my-gpt-5`).
3. In the **API Key** field, enter the API key from a service principal that has access to your Azure OpenAI resource.
4. In the **Provider settings** field, enter the following JSON:
```json theme={null}
{"resourceName": "Azure AI resource name"}
```
The value of `resourceName` must match the name of your Azure OpenAI resource — the same name that appears in the endpoint URL, e.g. `https://.openai.azure.com/`, or, if you're using Azure AI Foundry, `https://.services.ai.azure.com/`.
### Google Vertex AI
When configuring an AI connection where Google Vertex AI serves as the provider, add the following to the **Provider settings** field:
```json theme={null}
{"project":"your-google-cloud-project-id","location":"global"}
```
In this JSON:
* `your-google-cloud-project-id` is the ID of the Google Cloud project where your API key was created. You can look up the project ID in the Google Cloud Console by opening the project selector:
This enables access to AWS Cost Explorer MCP Server, AWS Pricing MCP Server, and AWS Billing and Cost Management MCP Server.
Configuring an LLM connection enables all [AI assistance features](/ai-assistance/overview) in OpenOps.
## Provider-specific settings
Some LLM providers require additional configuration beyond the API key or may require non-standard settings. This section offers guidance for some of the most common providers in this category.
### Azure OpenAI
When configuring an AI connection where Azure OpenAI serves as the provider:
1. In the **Model** dropdown, select **Custom**.
2. In the **Custom model** field, enter the name of a model deployment in your Azure OpenAI resource (for example, `my-gpt-5`).
3. In the **API Key** field, enter the API key from a service principal that has access to your Azure OpenAI resource.
4. In the **Provider settings** field, enter the following JSON:
```json theme={null}
{"resourceName": "Azure AI resource name"}
```
The value of `resourceName` must match the name of your Azure OpenAI resource — the same name that appears in the endpoint URL, e.g. `https://.openai.azure.com/`, or, if you're using Azure AI Foundry, `https://.services.ai.azure.com/`.
### Google Vertex AI
When configuring an AI connection where Google Vertex AI serves as the provider, add the following to the **Provider settings** field:
```json theme={null}
{"project":"your-google-cloud-project-id","location":"global"}
```
In this JSON:
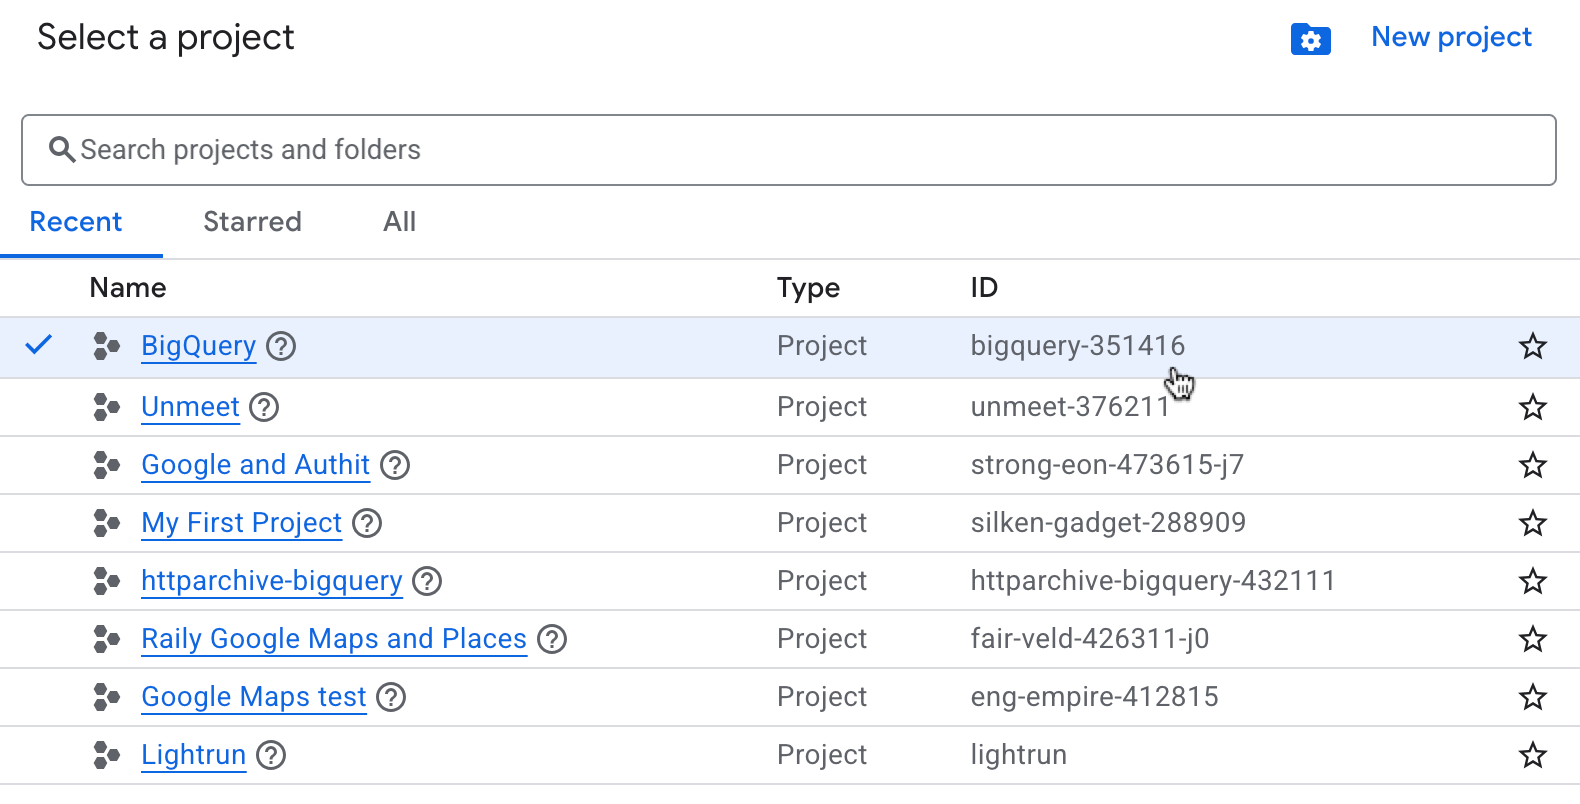
* `your-google-cloud-project-id` is the ID of the Google Cloud project where your API key was created. You can look up the project ID in the Google Cloud Console by opening the project selector:
 * Use `global` for `location` or, if needed, specify one of the [supported locations](https://docs.cloud.google.com/vertex-ai/generative-ai/docs/learn/locations#google_model_endpoint_locations) for your chosen model.